Wednesday, November 22, 2006

Thomas the Tank Engine


Welcome to my first cake tutorial... I'm glad you found me! If you're thinking about making a 3 dimensional cake this is a good place to start. You may or may not want to tackle it, but if you have the tools, a little patience, and don't mind making a bit of a mess in your kitchen, you've come to the right place!

    Here is a list of tools and products I use:
    • 3 batches of crusting buttercream frosting see recipes
    • Hershey's Cocoa powder (to add to black frosting, this will help you achieve a true black)
    • 11"X15" sheetcake pan (may also use 12"X18")
    • Wax paper
    • Cling wrap (plastic wrap)
    • Cake decorating spatulas (I mainly use the 8" straight spatulas on Thomas)
    • Wilton gumpaste tools (for creating Thomas' facial features)
    • Wilton Colors Black, Blue, Red, Yellow
    • Toothpicks
    • Marshmallow Fondant (follow link to recipe) or Wilton Fondant
    • Small rolling pin
    • Cornstarch or Powdered Sugar for dusting work surface
    • Crisco (not the butter variety)
    • Quality paintbrush (small)
    • Piping bags and tips
    • Piping Gel (for the back of Thomas' face)
    • 1 Wilton cookie stick (for Thomas' face) I use "8 size
    • 1 dowel rod (to be inserted into smokestack)
    • prepared cake board (I recommend using foam core or several cake boards bound together. You can cover your boards with colorful paper or material, then cover the top with contact paper. Sounds like another tutorial doesn't it?


    Watch the following Amazon slideshow and you'll see a Thomas the Tank Engine case very similar to the one used as a model in this tutorial. Makes a wonderful gift too!


    A few important rules to follow:
    • Make Thomas' face several days before the party
    • Bake cake ahead of time so you'll have time to freeze it
    • Have your cake board prepared before you take the cake from freezer
    • Have your frostings made and colored before you take the cake from freezer
    • Be sure you're using a crusting buttercream recipe (for best results)

Making Thomas' Face


Here's my starting point. I always make the face first, since it's made from fondant and must have time to dry out. Allowing the face to dry lightens the load a bit and there's less chance of it falling! Thomas' face will also hold it's shape better if allowed to dry on a flat surface (face side up of course!).

My first piece of advice is to cut your fingernails down before starting Thomas' face. You'll only get frustrated later when you're nails make unwanted scratches and markings on the face, which really is an important part of Thomas' look. The photos in this tutorial are heavily weighted toward creating the face for this very reason. If the face isn't right, you won't be satisfied with the end result.


I recommend making Thomas' face 7 days prior to the party if using marshmallow fondant and 4 days prior if using the Wilton store bought variety. I've included in this tutorial a photo of the toy I used to model my cake. This is a storage unit that holds a number of trains from the Thomas series and can be found at Toys R Us among other places. One curious thing that I hadn't noticed prior to making a Thomas cake is that his look changes from toy to toy. So, your Thomas may have a bit of a different look if you decide to use a different Thomas Train as a guide.

One reason I prefer to use this model, is that the width is nearly identical to that of the cake. For that reason, it's pretty easy to pattern after. Depending on how tall you chose to make your cake, you may or may not have the height found in this toy, but honestly I think it's better not to attempt to match the height. You may end up with a cake that wants to fall over if you make it too tall.

I've had many emails about the size of Thomas' face. Since this will be relative to the size of the cake, the size can be smaller or larger than the face in this tutorial. The face you see here measures at around 3 1/3" (84 millimeters).

Here are the basic instructions for creating the face:

1. Add a small amount of Wilton black color to the end of a toothpick and work into your fondant, (just a handful of fondant). I always add a bit of Crisco to my fingers to make the process a little easier.

2. Keep working the color into the fondant until you're satisfied the shade is right, but remember you only need a dot or two to get this right. If you add too much, you can always pinch off a portion of your fondant and kneed together with a little white fondant to lighten the color, but it's better if you don't have to do this.


As you're working through this tutorial, please feel free to email me with questions. I can't guarantee I'll be able to get to them while you're making your cake, but it will give me an idea of what information I might need to add to make this tutorial more complete. 

3. So, here we are with our gray fondant... you'll see that I dust my counter space with a little powdered sugar (can also use corn starch). This keeps my fondant from sticking to the counter. This is important! When you flatten out Thomas face and begin to sculpt and mold it into shape, you don't want to have your masterpiece stick to your counterspace. You could very easily destroy your work trying to release it. Some decorators use mats, some use wax paper or parchment, I just clean my counter tops and dust away!

There's more than one way to skin a cat, or so the saying goes. I'm sure there are other ways to make Thomas' face, but this is my technique. You can find these tools at Hobby Lobby, Joann's, or Michaels. They're also available on Wilton.com.

You'll want to aim for the center when forming the nose. So, start with you tool just below where you imagine the center should be.


Lift with finger and carefully form a little hole, insert a small ball of fondant into the hole, then close.


This feels a bit like plastic surgery to me! If you make a mistake, it's pretty simple to fix, but you don't want to crack the fondant... although you'll see that mine has one! Keep the fondant moist while you're working. When you kneaded the fondant the small amount of Crisco should have done the trick, but as you're working on the face, if you feel it begin sticking badly to your hands you may need to add a touch more. Don't go overboard though, you'll end up with a glossy finish if not careful.

After I close the nose flap, I usually take a bit of Crisco, work it into my hands, then run the nose down a bit... trying to make it smooth.

The gumpaste tools are helpful for making indentions and heavy markings for the mouth.

You can use the larger gumpaste tool (with the balled end) to make indentions for the eyes too, or you can use your finger. If you have fingernails, use the tool instead. Your nails won't do nice things to the fondant!


Take a small amount of white fondant and pinch at the ends, flatten to make Thomas' mouth. Shape to fit the indentions made with your gumpaste tools.

Brush on a bit of water or vanilla extract to the back of the white mouth, then insert it into place. Apply light pressure to set it.

Occasionally you may see details I have failed to mention or guide you through. One example of this is in the formation of Thomas' mouth. If you look in later photos, I've given him an outer lip of sorts. This came after I studyed the toy and realized it sharpened his look. I did this using the flat side of a toothpick... very carefully, then smoothing out the imperfections with my paintbrush. You'll be surprised what you can do with your fingers and the very basic of tools to bring Thomas' face to life!
Time to make the cheeks:
I don't know if it really is necessary, but I start by adding two balls of fondant on the back. I think this helps when you lie him face side up to dry as it pushes the cheeks up and out. The main cheek volume is achieved another way.


Once again we're going to do a bit of plastic surgery on Thomas. This takes a bit of patience, but you'll get it. Remember that working with fondant is somewhat like working with play dough, not exactly, but somewhat. You'll be able to use your fingers to gently smooth the open checks over the inserted ball. Just gently use your index fingers to pull and rub the fondant down. If you have any bumps or uneven shapes, just lightly massage the fondant until it smoothes out.

You'll see that I'm using a paintbrush in this last photo. Sometimes it helps to add just a drop (very small amount!) of water to a paintbrush and use it as a tool to smooth out the surface. It also is helpful in removing flakes of dry fondant or powder sugar dust from the face. Just run the brush over the mouth and you'll see the difference.


Adding support and eyes.
I use a Wilton cookie stick to add support to the face. It's not possible to do this after the face has dried out, so let's do it now. Carefully push the stick into the underside of the face, being sure that the stick is actually going into the fondant, not just along side the back. Push up into the face to about the point you imagine the bridge of the nose to be, then stop.


Adding his eyes is relatively simple to do. Roll out the shape in your hand, making the ball slightly smaller than what you imagine to be the right size, then flatten it out. You may add a very small amount of water or vanilla extract to the back of the eye with your paint brush and then place it down. Repeat this process for the blacks of the eyes. Do similarly for the eyebrows. I usually pinch then ends to give the eyebrows their shape.

The Cake

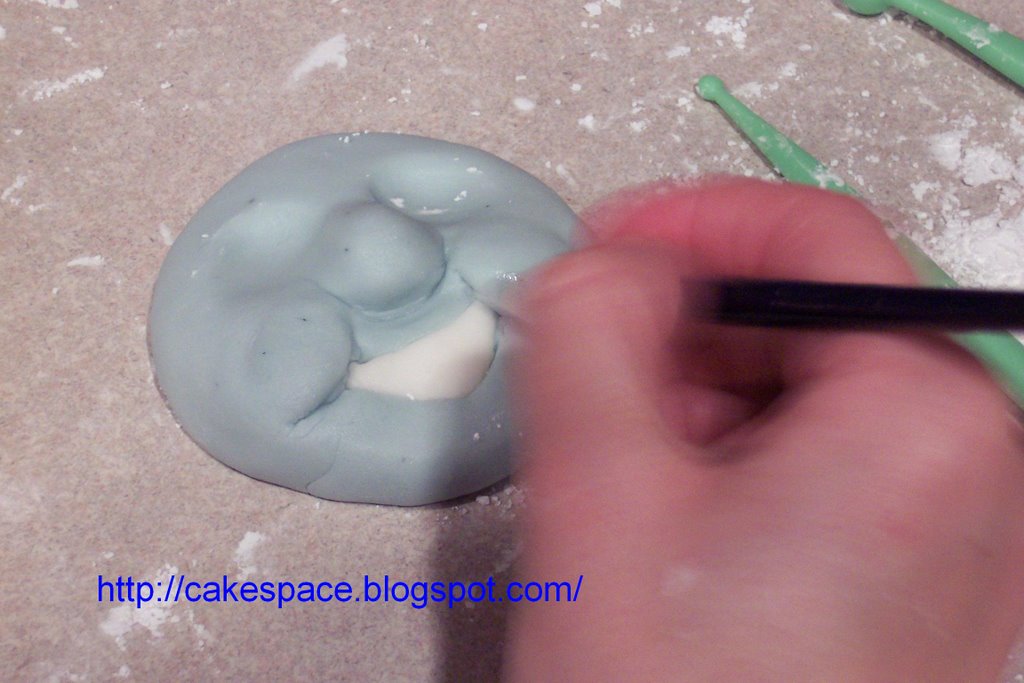
Whew! The face is done, now it's time to bake your cake, let it cool completely, then pop it into the freezer. When you're going to sculpt cake it's absolutely necessary to freeze it first, otherwise you'll have a huge mess!

Be sure your cake board is strong enough to carry the weight of your cake. In this tutorial I used heavy foam core (about 3/4" thick). You don't want to use anything that will flex on you.
I use an 11"X15" Wilton sheetcake pan for this cake, but using the next size up... 12"X18" is a better idea. This will give you more scraps to play with. I had some trouble using the smaller pan as I nearly ran out of scraps to play with. I think my cake would have looked better using the 12"X18".

The 11X15" cake pan takes 2 boxed cake mixes, the 12X18" uses 3. If you're making your mix from scratch, just double it for the smaller pan and obviously triple the recipe for the larger.

When you're cake is out of the oven and completely cool, take a cooling rack and place it on top of your pan, tip the cake upside down and onto the rack. Then, clean your pan. Once the pan is clean, cover your cake with wax paper, allowing the paper to hang over the sides. Now, place the clean pan over the top of the cake. Pick up the rack and pan together, turn over allowing cake to fall back into the pan. Then, cover the extended wax paper over the top of the cake. Cover the entire pan and cake with another layer of wax paper, then a good wrapping of plastic wrap. Don't go lightly with the wrappings, this will prevent freezer burn!

Freeze your cake for a couple hours or until frozen. I've made the cake several days in advance of the construction before without problems, so if it's Tuesday and Your party is on Saturday, you can bake and freeze today no problem.

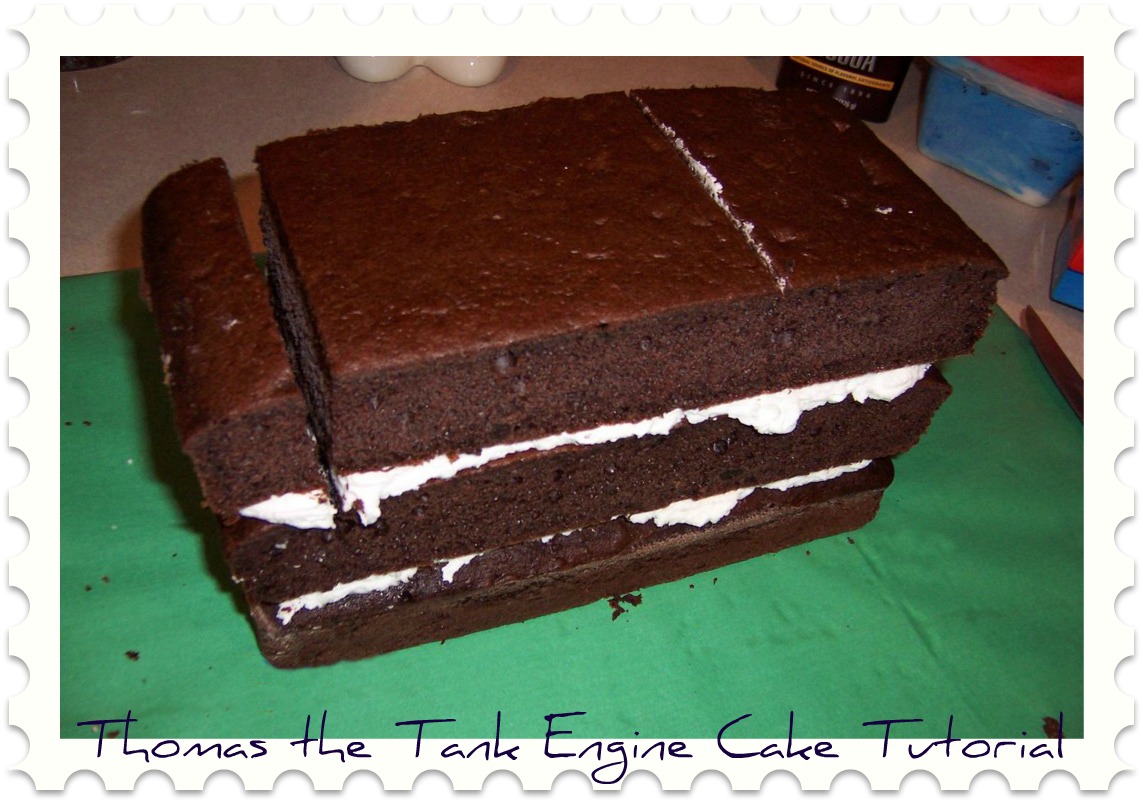
Before you cut your sheetcake, you may want to score it. I've tried to show my scoring marks in this photo. Score it so you'll have a total of 3- 4 3/8" pieces, this will leave you with a strip of cake at the end that you'll use later.

The scored cake in this photo is an 11"X15", if you use a 12"X18" (recommended), your scored cake will look different.
Cut your cake, stack the 3 large pieces, frosing between layers.


Shaping Your frozen cake in just a few steps. The best advice I can give here is to study your model and try and duplicate the look by shaving away at your stacked construction using a sharp knife. I recommend shaving just a small amount at a time. You'll see in this frontal photo that I've shaved the cake to make it look rounded on the sides. I've also left a base at the front of the cake, which closely resembles that of the model.


Use your extra strip to build up the back of the cake, build a smokestack and whistle. This can get messy, but once it's frosted will look great.


Remember, there is no right or wrong way to do this. Originality is a wonderful thing! My photos are only to be used as a guide and it's important to note that I moved my scraps around a bit before settling on how to place them. You may find a bit of gaps from one photo to the next and also see that there is a lack of transition. Sorry about that! As I make more cakes I will develop a proven system, but for now I recommend having fun with it and allowing your own creativity to guide you.


Trying the face on for size. Your cookie stick should touch the base of the cake board. You may need to trim it a bit. Keep in mind that you'll be adding frosting to your cake, so you'll want to allow for that extra height.

You'll see in these photos that I've built up the back a bit more using scraps. The added height made the cake look more balanced and better matched the model I was using. I also made the bell and smokestack. Frosting these smaller parts is a very delicate thing! Be sure to go slowly.


Frosting Thomas

For best results, use a crusting buttercream recipe. I have a couple recipes available for those interested.
You'll want to start with a crumb coat. If you're not familiar with crumb coats, it's basically just a light layer of buttercream frosting necessary to catch your loose crumbs, which by this point you will have a lot of. Frost the entire cake without regard to how pretty it is, then let it crust (about 7 minutes).

I've included this photo to show you how I normally apply my colored frosting. I always use a bag, as it gives me better control. Upon filling in a space, I place my spatula under hot water, shake, then smooth over the piped frosting.

You'll see too that I used scraps to make the wheel covers... is that the right word?

You'll want to cut your dowel rod down, but I placed this in the smokestack to add a bit of support. I don't usually have to do this, but for whatever reason my cake appeared to be sliding, so this was a quick fix. Anytime you have a stacked cake you may have to dowel. Be ready for this by having dowels on hand just in case.


Here's an alternate way to decorate this cake. As I mentioned earlier, you'll find Thomas' look changes from one toy to another. On this particular cake I made the base black around the wheels. Some of the details are different too.


When you're ready to permanently place Thomas' face into the cake, take a spoon of piping gel and smear it on the backside of his face. This will act as a glue and keep his face in place.

The wheel dilemma now presents itself. You'll see that the wheels on your cake are a bit small, if you make them the way I have. I haven't found a good solution for this. In the toy, the wheels are suspended below the base of Thomas' body. So, I've just made them smaller to fit the cake. You could decorate the cake in such a way that the wheels were larger if you wanted to make the other features thinner. I opted to do it with smaller wheels and a larger body.


When you're happy with Thomas, take some frosting and pipe out a track to make the look complete.


I usually keep shaped cakes cool in the refrigerator before transporting to a party. A cold cake will be more rigid and less likely to fall apart on you.

A secret to transporting successfully is to use the waffle like shelf paper (available at Walmart) between your cake board and the floor of your vehicle. This technique has never failed to hold my cake in place.

Final Step!


Eating Thomas! Take a lot of photos before you start cutting and be sure to send one to me! If you'd like your cake featured on this site, please give me permission to share it. ; ) Of course, I'll give you credit for whatever masterpiece you come up with! Can't wait to see it. : )